Installing a Delta pot filler faucet
Written by Mike Johnson in Design, Kitchen, Water

In the kitchen a pot filler faucet offers tremendous utility for people who love to cook. In this tutorial you will learn how to install the water supply that feeds the fixture. Before we begin it’s worth noting that absolute accuracy with plumbing this faucet is critical. A pot filler like the Delta 1177LF has an arm that extends 24 inches and this creates incredible leverage on the plumbing. Over time a faucet like this gets used multiple times and the water supply located on the inside wall can become loose, if this happens the only way to fix the problem is to tear into the wall and remount it. To prevent this from happening in your kitchen, plumbing the water supply pipe must be mounted to a solid block behind the wall, if not you run a very serious risk of a failed installation. While plumbing in Oconomowoc over the years I’ve seen faucets like this come loose and repairing it can be very expensive.
Plumbing a pot filler faucet starts in the wall
The following project was for a customer located in Oconomowoc on Oconomowoc lake.
Most pot filler faucets are mounted on a vertical wall either located behind the stove or on the side located in a specially designed cove. For this tutorial the stove has a custom surround made of stone. The faucet will be mounted on the right side wing wall.

Wall cavity where the 1/2" water supply and mounting block is located
Water supply and mounting block
In the photo above you can clearly see the 1/2 inch water supply that comes up from the basement. You can also see a special supply insulator that holds the pipe tight in the hole, this keeps vibration to a minimum and prevents drafting issues. The water supply is always cold, hot water is never used for a pot filler.
The wood block you see in the photo is 4″ by 4″ doug fir that was selected for mounting the water supply. The wood block needs to be inspected for knots and splits to prevent future problems. I could of just used the block as it came from the lumber yard but accuracy is critical so I ran it through a table saw on all four sides to guarantee the block would have a perfect mounting surface. After the block was checked for quality and surfaced on the table saw I pre-drilled the screw holes.
Pre-drilling screw holes is something that many people don’t do and that’s a mistake. To make sure a screw holds well and doesn’t split the wood pre-drilling the block the shank diameter of the screw is the best insurance for a perfect installation.
Determining the right location for mounting a Delta pot filler
The location for the block was calculated by a couple of factors. The home owners are buying a commercial oven/stove top so I started by reading the dimensions of the very top of the stove surface from the floor. Once I had that measurement I then read a PDF of the actual dimensions of the pot filler. I was disappointed that Delta didn’t supply the right numbers on the drawings and since the pot filler was not on the job site yet I had to go off of memory and do a little guessing. The home owners decided they wanted the bottom of the faucet outlet 14″ from the top of the grate, this would allow the use of a large pot for cooking soups or boiling a large pot of noodles.
Once the proper height was chosen the next measurement is the horizontal location. For this application I had to located the faucet as far away as I could from the back wall. The Delta 1177LF has an articulating arm that measures about 24 inches fully extended and it’s hinged in the middle, this of course would mean I have to be about 12 inches away from the back of the wall.
The last measurment that needs to be calculated is the depth of the supply from the finished wall surface. The wall surface will be stone about 2 inches thick. Just like the leverage on the faucet I talked about earlier the same leverage applies to the water supply. The water supply needs to be as close to the finished wall surface as possible.
Start plumbing by working backwards!
The faucet itself is held on the water supply by using a 1/2″ brass nipple that threads into a brass elbow. In the plumbing business this elbow is commonly called a “drop ear” and is used most often for mounting shower heads. The drop ear has two tabs with holes used to secure the fitting to the mounting surface. I could of started by connecting to the existing water supply first but it’s much easier to start backwards with the drop ear so that’s what I did. Below is a photo of the drop ear soldered to a piece of 1/2 inch copper water pipe.

Brass drop ear mounted to copper water supply for pot filler nipple
Installing the first part of the faucet supply
Once that was done and cooled down from the heat the next step is to mount it on the block. For this step the tools required are a drill, drill bit, level, and tape measure. Simply measure the correct location and hold the part up to the block and mark it. Then take a very small drill and pre-drill a very small hole into the block (remember, pre-drilling creates a better installation and has less chance to split the wood when driving the screw in).

preparing for mounting the drop ear
The next step it to take a temporary 1/2 inch nipple and screw it into the brass drop ear. Take the level and simply level the part, then screw the drop ear in snug. Check again for level and tighten it up all the way.

Water supply nipple

Front water supply view
Plumbing the two parts together
When it’s secured to the block and guaranteed level the last step is really easy, simply connect the two parts together and keep checking with a level and a square to make sure it doesn’t get out of alignment. When that’s all done an extra 2-hole copper strap should be installed as an extra safety precaution to keep everything solid.

The completed water supply for the Delta pot filler faucet #1177LF
Testing the plumbing supply for leaks
Testing the plumbing for leaks is mandatory. When I did the plumbing for this particular job I installed a new ball valve in the basement where the water supply comes up through the floor.

New ball valve for water suply
With the ball valve turned on and a temporary nipple with a cap screwed on tight the system can be tested. Once tested it needs to be inspected, then it can be covered up and a finished wall surface can be installed. Below is what it looks like under a water pressure test.

Delta pot filler supply under water test

Tested and ready for installation of wall covering
Installing the faucet and trim
Once the stone was installed on the wall a wood block was made to prevent clamping pressure on the mortar to keep it from cracking. The photo below best illustrates what the final water supply looks like before any hardware is installed.

The next step is the installation of the faucet support mounting flange. The flange is made of brass and it centers itself over the water supply nipple. The flange gets screwed to the wood block, here I used 3″ screws and once again pre-drilling is absolutely critical. The final step is to tighten the set screw to the water nipple and slide the trim ring on.

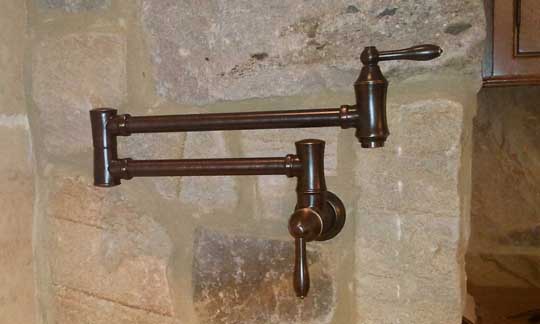
The last 3 photos show the pot filler installed
Below is a photo of the installed Delta pot filler. The stone you see in the background is over 1 1/2″ thick. With the combination of good lighting and great looking stone the faucet really turned out to be fantastic. The faucet is collapsed against the wall and out of the way.

Here you can see the faucet pulled out against the wall and ready to fill a pot with water.